Showing posts with label recipes. Show all posts

November 22, 2020

This site has affiliate links and sponsored content. Affiliate links means if you click on my link and buy something, I will earn a small commission from the advertiser at no additional cost to you. Read my Disclosure Policy.

Thanksgiving Pilgrim Hat Cookies #Recipe


With the weather turning all cold and rainy, the kids are going to get stir crazy. Why not have fun in the kitchen with them making a Thanksgiving Day treat! These Thanksgiving Pilgrim Hat Cookies are so cute, easy to make and super yummy!

To make these adorable hats you will need:
  • Reese's Peanut Butter Cups (Small Size)
  • Reese's Pieces
  • Keebler Fudge Stripe Cookies
  • Frosting
  • Food Coloring
  • Piping Bag or sandwich bag

Instructions:

  1. First you will want to mix your frosting with the food coloring. I put a little in a bowl and added food coloring to it and mix till it is the color you are wanting. I did yellow and a light orange for mine. Put your frosting in a piping bag ( I used a sandwich bag with the tip cut off).
     
  2. Next lay your cookies face down on some wax paper. Then pipe out a circle around the center whole of the cookie.
      
  3. Place the peanut butter cup on top of where you put the frosting. Then pipe around the peanut butter cup.
     
  4. Next get a Reese's Pieces and place a little frosting on one side and stick it to the peanut butter cup.
Seriously how cute are these cookies and a fun way to spend some time with the kids!

November 19, 2020

This site has affiliate links and sponsored content. Affiliate links means if you click on my link and buy something, I will earn a small commission from the advertiser at no additional cost to you. Read my Disclosure Policy.

Gobble Gobble!!! Jolly Rancher Turkey Suckers are perfect for #Thanksgiving treats and table decor! #Recipe


Getting ready for Thanksgiving? These turkey suckers are just the "sweetest"! They are easy to make with just a few ingredients. They are perfect treat for a school party or to use as festive table decorations! 


Ingredients

  • Jolly Ranchers – orange, yellow, green, red
  • Orange Tic-Tacs
  • Candy eyes
  • Red Hot candies
  • Sucker sticks


Directions
  1. Preheat oven to 275 degrees
  2. Line a cookie sheet with parchment paper
  3. Unwrap Jolly Ranchers
     
  4. Stick together 2 yellow Jolly Ranchers vertically, make sure they are touching. Then take your red, orange and green jolly ranchers and stick them above the yellow ones in a fan motion. Leave enough space so when they come out of the oven you can put a sucker stick in them.
  5. Stick in oven for about 5-6 minutes. Keep a close eye on them and take them out when you get the melted desire you are wanting.
     
  6. Immediately roll the end of a sucker stick in each sucker towards the bottom.
      
  7. Quickly add the candy eyes, Tic-Tacs and Red Hots. If suckers start to harden, don’t worry, get a lighter and stick the flame carefully where you want the candies to go to and hold for a few seconds. It will melt the sucker just enough so you can stick the candies on.
      
  8. Let them set at room temperature until harden, about 10 minutes.
  9. Then they are ready to eat!!
Won't your family, friends and kids think these are the cutest sweets every?  So bright and colorful, they are a perfect Turkey Day craft/recipe to do with the kids!

October 28, 2020

This site has affiliate links and sponsored content. Affiliate links means if you click on my link and buy something, I will earn a small commission from the advertiser at no additional cost to you. Read my Disclosure Policy.

Mummy Dogs #Recipe #halloween


These are super easy to make and you only need a few ingredients to make these yummy Halloween treats!  We make these every year for the kids, even as teenagers they still love this fun Halloween tradition!
 

Ingredients:

  • 1 can (8 oz) refrigerated crescent dinner rolls
  • 1 pack of hot dogs
  • Cooking spray or silicone liner/parchment paper to line cooking sheet
  • Mustard

Instructions:

  1. Preheat oven to 375 degrees
  2. I line my working space with flour, so the crescent rolls don't stick.
        
  3. Unroll your dough and separate it. Cut the sections into long strips. 
  4. Wrap pieces of dough around the hot dog to give the mummy his bandages. Make sure to leave room for his face.

  5. Spray your cooking sheet with cooking spray or line it with parchment paper/silicone liner
  6. Place all of your wrapped hot dogs on the sheet.  
  7. Bake for 13-17 minutes until dough is golden brown.
  8. Use the mustard to make the eyes!
  9.  
    These are cute and easy to make, a sure delight for the kids!

October 20, 2020

This site has affiliate links and sponsored content. Affiliate links means if you click on my link and buy something, I will earn a small commission from the advertiser at no additional cost to you. Read my Disclosure Policy.

Puking Pumpkin Guacamole Dip #Halloween #Recipe


Are you ready for all things Halloween?   It’s time start making some creative,  creepy, spooky treats  and such!   This  Puking Pumpkin featuring  Guacamole dip is a sure fire hit!

What you will need:
  • Small pumpkin
  • Spoon
  • Knife
  • Marker
  • Guacamole (I used Wholly Guacamole)
  • Chips
Instructions:
  1. Wash the outside of your small pumpkin
  2. Cut into the top to remove the stem like you would when you carve pumpkins and then completely clean out the pumpkin. 
  3. Then use a marker to draw the eyes and mouth. Make sure the mouth is low and has a wide enough opening to  allow the "vomit" to come out. 
  4. Carve the pumpkin
  5. Place your pumpkin on a large plate or serving platter.  Place the backside of the pumpkin close to the end or edge of the plate.  
  6.  Add a spoonful of guacamole (homemade or store bought) through the top of the pumpkin and put it on the bottom of the pumpkin by his mouth.  
  7. Spread the remainder of the guacamole out from his mouth onto the plate.  Surround the guacamole with corn chips (I like to use the blue ones, makes it look spooky)

This is fun for the kids and super tasty! 

October 14, 2020

This site has affiliate links and sponsored content. Affiliate links means if you click on my link and buy something, I will earn a small commission from the advertiser at no additional cost to you. Read my Disclosure Policy.

Vampire Donuts - A Quick and Easy Treat For #Halloween! #Recipe


With everything going on, your kids may or may not have holiday parties this year.  If  you are looking for a fun treat idea to bring to your kids school for their Halloween party, these are super cute and can be individually wrapped in sandwich bags/   No parties this year, no problem have your own little family party at home and treat the kids to these spooky donut treats!  These are super easy to make, yummy to eat and when you are done, you have some super cool Vampire teeth to sport!

Ingredients:

Instructions
  1. Squeeze a set of vampire teeth and place in the hole of the donut (depending on the size of the hole of the donut, you may need to cut the hole out a little bit).   Here is a tip...if you are struggling to get the teeth in the hole, use a small rubber band to make the teeth tighter and easier to fit!
      
  2. Place some frosting on the back of the eyes and secure them to the donut.
  3. If you have red frosting, you can also use that for the added blood effect.
Don't want to go with the Vampire teeth aspect?    Then still adhere the candy eyes to the donut and have an instant monster staring back at you!

Struggling to get the teeth in place, no worries, use the red frosting to make your own blood drips and just serve donuts with the teeth on the side!

September 25, 2020

This site has affiliate links and sponsored content. Affiliate links means if you click on my link and buy something, I will earn a small commission from the advertiser at no additional cost to you. Read my Disclosure Policy.

Pumpkin Inspired Graham Cracker & Peanut Butter Pops #Recipe


These graham cracker pops are adorable to present for the Fall season and are incredibly easy to make!  They are perfect for Halloween, Thanksgiving or any Fall get together!


GRAHAM CRACKER & PEANUT BUTTER POPS


Ingredients:
  • 1-1.5 cups graham cracker crumbs (about 10 to 12 standard-sized crackers)
  • 4 oz. cream cheese (about half a cup)
  • ¼ cup peanut butter
  • 1.5 cups orange candy melts
  • 1 teaspoon coconut oil
  • Lollipop sticks
  • ¼ cup melted chocolate
  • Green icing
Yields: 15 to 20 1-inch pops

Instructions:
  1. Line a baking sheet with parchment paper and set aside. In a large bowl, combine graham cracker crumbs, cream cheese and peanut butter. Mix until you achieve a fairly sticky consistency. If you feel like your mixture is still too dry, continue adding peanut butter, one tablespoon at a time.
      
  2. Roll graham cracker mixture into one-inch balls and place on your lined baking sheet.
      
  3. In a microwave-safe bowl, microwave your candy melts for about 30 seconds. Stir in coconut oil and microwave for another 30 seconds.
        
  4. With the help of a fork, dip and coat your graham cracker balls in the melted candy. Let them set on your lined baking sheet.
       
  5. Place a lollipop stick into each graham cracker ball. With the help of another lollipop stick (or a toothpick), carefully dab on some melted chocolate at the end of the lollipop stick (the end that meets that graham cracker treat).
     
  6. Using a piping bag, pipe green icing on top, giving them a “swirly” shape – these will act as your pumpkins’ leaves.
  7. Place in the refrigerator until set (about 20 to 30 minutes). Enjoy!
This site has affiliate links and sponsored content. Affiliate links means if you click on my link and buy something, I will earn a small commission from the advertiser at no additional cost to you. Read my Disclosure Policy.

Fun Fall Treat - Hershey Kiss Acorn Treats #Recipe


These Hershey Kiss Acorn treats are super easy to make and the kids will have a blast making them with you!  They are fun fall treat!

You will need the following:
  • 1 cup chocolate chips, divided
  • Bag of Hershey’s Kisses
  • Mini Nilla Wafers, Nutter Butter bites,  Mini Chips Ahoy  or Mini Golden Oreos (you can score the small containers for $1 at most stores)
Directions
    1. Place about 1/4 cup of chocolate chips in a microwave-safe bowl. Microwave for 1-2 minutes, stopping and stirring it every 20 seconds until melted.
        
    2. Line area with wax paper for easy clean-up
       
    3. Unwrap the kisses and use the melted chocolate to attach one kiss to each a mini Nilla wafer
       
    4. Spread melted chocolate on the flat side of the chocolate chip and attach them to the tops of the acorns. Let cool &  serve.


    September 23, 2020

    This site has affiliate links and sponsored content. Affiliate links means if you click on my link and buy something, I will earn a small commission from the advertiser at no additional cost to you. Read my Disclosure Policy.

    Monster Whole Wheat Chocolate Chip Cookies #Recipe #Halloween


    Looking for a fun treat for Halloween? Why not try these Monster Whole Wheat Chocolate Chip Cookies. Not a fan of chocolate chips, substitute with peanut butter chip, butterscotch chips, etc.

    Ingredients
    • 2 cups whole wheat flour
    • 1 tsp baking soda
    • 1/s tsp salt
    • 1 cup butter or margarine
    • 3/4 cup lightly packed brown sugar
    • 2 eggs
    • 1 tsp vanilla extract
    • 1-1 1/2 cups semi-sweet chocolate chips
    • candy eyeballs
    • non-stick spray


    Directions

    1.   In a small bowl combine flour, baking soda and salt.
    2.   In a separate bowl use an electric or stand mixer and cream the butter and sugar. Once creamed add eggs and beat until light and fluffy. Add in vanilla and mix.

    3.   With the mixer on slow speed mix in the flour mixture until just incorporated. Stir in chocolate chips.
     
    4.  Drop batter by heaping teaspoon onto a lightly sprayed cooking sheet (we used Pam). This cookie recipe spreads so make sure each cookie is 2 inches apart. Lightly press down cookies and place candy eyeballs on cookies.

    5.  Bake in a 350 F oven for 10 minutes.
    6.  Remove from oven and let cool completely.

    Here are some links on where to order candy eyes:

    September 10, 2020

    This site has affiliate links and sponsored content. Affiliate links means if you click on my link and buy something, I will earn a small commission from the advertiser at no additional cost to you. Read my Disclosure Policy.

    Apple Picking Season = Baked Apple Pie Roll-Ups #Recipe


    Do you have left over apples from apple picking or just want to make a fun treat that the kids will love on a cool day, then check out this super easy recipe for Baked Apple Pie Roll-Ups!

    Ingredients
    • 10 slices white or wheat bread (I used wheat)
    • Apple Pie Mix (see recipe below)
    • ⅓ cup melted butter
    • ½ cup sugar
    • 1 teaspoon cinnamon
    Apple Pie Mix
    • 2 medium apple, peeled, chopped
    • ½ cup sugar
    • 1 ½teaspoons ground cinnamon 


    Instructions
    1. Preheat oven to 350 degrees.
    2. Flatten each piece of bread with a rolling pin. Cut the crusts off your bread. Combine cinnamon and sugar on a small plate.
    3. Spoon the apple pie mix on each slice of bread and roll up.
    4. Dip each piece into melted butter and then roll in the cinnamon sugar mixture.
    5. Place seam side down on a silicone lined pan and bake 15 minutes or until browned and crispy. Serve warm.
    I warn you, these are so addictive!  They are great warmed up in the microwave or toaster oven too!

    September 9, 2020

    This site has affiliate links and sponsored content. Affiliate links means if you click on my link and buy something, I will earn a small commission from the advertiser at no additional cost to you. Read my Disclosure Policy.

    Apple Picking Season = Apple Dump Cake #recipe

     We went apple picking today and picked a bunch of Cortland and Johnny Gold apples.  I saw a bunch of different dump cake recipes online and hubby immediately asked if I could make some type of apple cake tonight.  I of course obliged, who can resist the smell of apples baking in the oven?


    Ingredients:
    3 - Large apples sliced apples
    1 - Package yellow cake mix
    1 - Stick of butter
    1 - Tbsp. sugar/cinnamon mixture

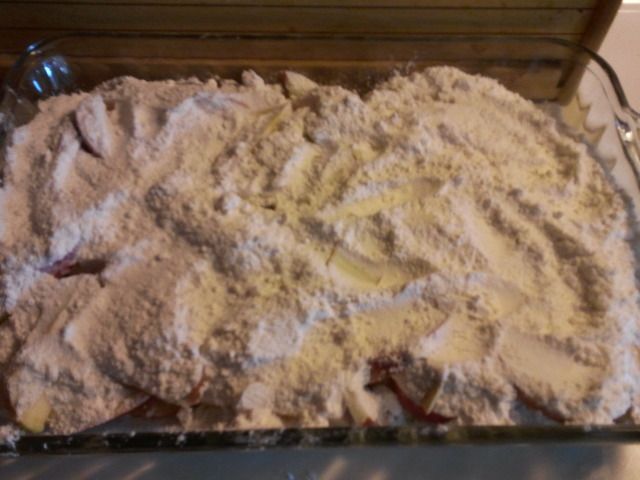
    Spray a rectangular glass cooking dish with cooking Spray.  Layer apple slices (or other fruit) at the bottom of a pan that has been coated with non-stick spray.

    Sprinkle the cake mix on top of the sliced apples.


    Melt the stick of butter in the microwave on low heat in a microwave safe container.  Pour the melted butter over the cake.


    I then sprinkled the sugar/cinnamon mixture on the top and placed in the oven.


    Bake at 350 degrees  for approximately 45 minutes.  If you notice it still dry in areas while baking, it is okay to add a Tsp. or so of water to the areas that is still the dry cake mix.


    Serve with Vanilla Ice Cream!