Showing posts with label recipes. Show all posts

September 8, 2020

This site has affiliate links and sponsored content. Affiliate links means if you click on my link and buy something, I will earn a small commission from the advertiser at no additional cost to you. Read my Disclosure Policy.

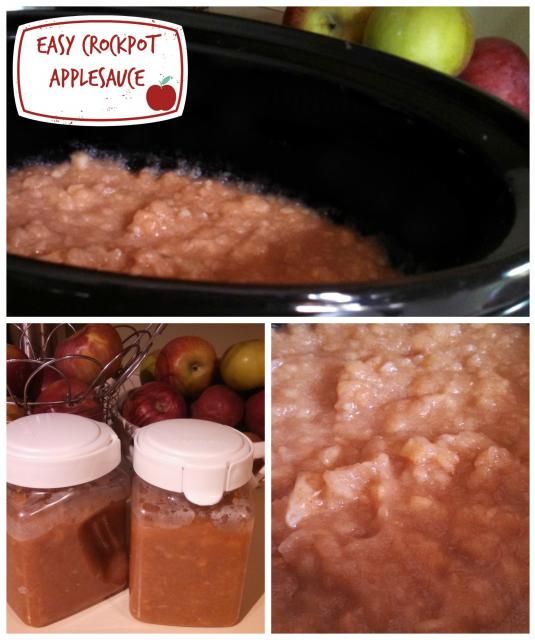
Apple Picking Season = Easy crock-pot applesauce #Recipe


The family and I went apple picking this week, so of course we have an abundance of apples!  Yesterday we decided to make crock-pot applesauce, normally we can applesauce, but thought we would try something different this year!

Ingredients:
  • 10-12 apples peeled, cored and thinly sliced (I used Cortland, they are a little tart, thus the sugar)
  • 3/4 cup sugar(may omit if you have a sweeter apple)
  • 1/2 cup water
  • 1 tsp cinnamon on top 
What to do:
  1. Peel, core and thinly slice apples.  Rinse thoroughly.
  2. Place apples into crock pot, cover with water, sugar and cinnamon.
  3. Set on low. 
  4. Cook covered for 6-8 hours until apples have softened. 
  5. Stir occasionally to break up the apples.
NOTE: If you prefer your apples smooth then you may use an immersion blender or blender to achieve this consistency.

September 3, 2020

This site has affiliate links and sponsored content. Affiliate links means if you click on my link and buy something, I will earn a small commission from the advertiser at no additional cost to you. Read my Disclosure Policy.

Chicken Caesar Wrap #Recipe #BackToSchool


As we gear up for in school classes or online learning from home, the kids will surely tire of the same lunches each day. Why not get creative this year and make some new and interesting options!

 Chicken Caesar Wrap

  • Flour tortilla warps
  • iceberg lettuce
  • grilled chicken
  • Parmesan cheese
  • Caesar salad dressing
  • salad croutons
Top a wrap with dressing, lettuce, chicken, cheese and croutons.   Roll and enjoy!

You can either prep and grill your chicken for the week or in the lunch meat section of the store there is grilled chicken chunks!

September 2, 2020

This site has affiliate links and sponsored content. Affiliate links means if you click on my link and buy something, I will earn a small commission from the advertiser at no additional cost to you. Read my Disclosure Policy.

Strawberry and Goat Cheese Sandwich #Recipe #BackToSchool


As we gear up for in school classes or online learning from home, the kids will surely tire of the same lunches each day. Why not get creative this year and make some new and interesting options!

 Strawberry and Goat Cheese Sandwich

  • English muffins or bagel thins
  • Goat Cheese (softened) or plain white cream cheese
  • Strawberry Jam
  • Strawberries
Split an English Muffin/bagel thins and lightly toast the halves.   Spread each half with softened goat cheese or plain whipped cream cheese.  Top with a thin layer of jam, followed by a layer of strawberry slices.  Top with remaining half of muffin

July 11, 2020

This site has affiliate links and sponsored content. Affiliate links means if you click on my link and buy something, I will earn a small commission from the advertiser at no additional cost to you. Read my Disclosure Policy.

How to Make Homemade Tomato Sauce

Please note, I do not consider myself an expect of canning! This is just what I have learned the last few years  of having a garden!!!

Step 1- Get your tomatoes, washed and ready.
I have my own garden and just use whatever is ripe. I do not measure out my tomatoes, just whenever I have a couple gallon bags full of them, I start canning. I only have two small raised gardens.

Step 2 - Get the jars and lids sanitized
If you have a dishwasher, use the "sanitize" cycle for the jars. I don't have a dishwasher, so I submerge the jars in a large pot (I use a large soup pot) of water and bring it to a boil.

For the lids, I use a small pot of water. Place the lids in the boiling water for at least several minutes.

Step 3 - Remove the tomato skins and seeds
Boil yet another pot of water. Place the tomatoes, a few at a time into of boiling water for no more than 1 minute.  Then submerge them into a bowl of ice water. This will help the skins slide right off!!!

Once the skins are removed, Then cut the tomatoes in quarters and remove the tough part around the stem and any bruised or soft parts.

Next just use your fingers to scoop out most of the seeds.

Step 4 - Drain the tomatoes
When you are scooping out the seeds, place the tomatoes into a colander while you work on rest. I place the colander in the sink, so the excess water of the tomatoes just drain into sink. This helps more of the water to drain off.


Step 5 - Cook the tomatoes!
Combine the tomatoes in a big pot. Boil it down to thicken the sauce. Simmer until sauce reaches desired consistency.

Don't overcook it; just bring it to boil at the end to sanitize it and cook down the tomatoes.
The tomatoes will fall apart into sauce. But if they do not, here is another helpful hint: pour tomato sauce into blender and blender. Caution it will be HOT!!!


Step 6 - Fill the jars with sauce
Use a canning jar funnel and pour the hot sauce into the hot jars. Fill them to within ¼-inch of the top, then add 1-2 Tablespoons of lemon juice to the top. This will help reduce the chance of spoilage.


Step 7 - Add the lids and rings to the jars
Make sure to wipe down he top of the jars, to remove any left over tomato sauce that may have spilled. Place on the lids and the screw on the rings.


Step 8 - Boil the jars again!!!
Place the tomato sauce into the large pot, keep them covered with at least 1 inch of water. I used the same pot I previously used in the beginning. Keep the water boiling 35 minutes for pints and 40 minutes for quarts.

Remove from water and place on a towel and wait for the magical bings! I use the tomato sauce through out the year for spaghetti, chili, you name it. Just add desired seasoning then.

This is what I use for my garden space (pic at the beginning of the season).  Hubby made them for me!!! 
 

July 10, 2020

This site has affiliate links and sponsored content. Affiliate links means if you click on my link and buy something, I will earn a small commission from the advertiser at no additional cost to you. Read my Disclosure Policy.

Tra La Laa Trail Mix #Recipe #CaptainUnderpants #TraLaLaa

Based on the bestselling book series, DreamWorks Animation presents the long awaited global movie event, Captain Underpants. This outrageous family comedy tells the story of two overly imaginative pranksters, George (Kevin Hart) and Harold (Thomas Middleditch), who hypnotize their principal (Ed Helms) into thinking he’s an enthusiastic, yet dimwitted, superhero named Captain Underpants.


Tra La Laa Trail Mix ingredients:
  • Pretzels
  • M&Ms
  • Raisings
  • Peanuts
  • Sunflower seeds
 Mix all of the above ingredients in a bowl and store in an air tight container.  This is the perfect snack for grab and go!

July 7, 2020

This site has affiliate links and sponsored content. Affiliate links means if you click on my link and buy something, I will earn a small commission from the advertiser at no additional cost to you. Read my Disclosure Policy.

Panda cupcakes #CampWarnerBros

We Bare Bears: The Movie is now available to own on Digital, Blu-ray & DVD.    Why not have a super fun movie night with some cute cupcake treats!.  Here is what you will need to make these cute cupcakes!
  • Cake mix + ingredients listed on the box
  • Can of frosting
  • Mini Oreos
  • Tube of chocolate icing
  • Handful of chocolate chips
  • Small bowl of sugar
  • Sandwich size ziploc bag
Bake cupcakes according to package.  Let cool and frost.  Immediately after frosting roll cupcake in the bowl of sugar.
Next up insert a chocolate chip for the nose.
Then use the chocolate frosting to make the mouth and  eyes.  Place a spoonful of white frosting in a ziploc bag and cut off the tip.  Gently squeeze and make the white dots in the eyes.
Then separate a mini Oreo, use each half for the ears.

July 6, 2020

This site has affiliate links and sponsored content. Affiliate links means if you click on my link and buy something, I will earn a small commission from the advertiser at no additional cost to you. Read my Disclosure Policy.

We Bare Bears: The Movie + Gummy Bear Slime #CampWarnerBros

We Bare Bears: The Movie is now available to own on Digital, Blu-ray & DVD.

When Grizz, Panda, and Ice Bear catch the attention of the Department of Wildlife Control, their world turns upside down! Forced to go on the run by the diabolical Agent Trout, the Bears rely on friends both old and new on a wild and hilarious road trip. Join the Bears as they stack up for their biggest adventure ever!

A great movie about friendship and brotherhood.  It is influenced by today's political climate and addresses many issues we are facing today.  It is a great film to talk about with the kids and the actions in the movie.   It is entertaining for any age!   We love the We Bare Bears the Movie! 

Check out this fun gummy bear slime inspired recipe!   


GUMMY BEAR SLIME INGREDIENTS
  • Gummy bears
  • 1/3 cup powdered sugar
  • 1/3 cup cornstarch
Mix the powdered sugar and cornstarch together.
 
Microwave gummy bears in a heat-safe bowl for 10-15 seconds.

Stir, and continue heating in 10-15 second intervals until gooey. 

Stir in powdered sugar and cornstarch mixture, until the gummy bear slime forms a ball.


A few notes after making this.   I would of divided the bear colors and do different batches to have fun colors to play with.   If it gets too sticky, add more dry ingredients!  


 I received the above mentioned to facilitate this review. Regardless, I only recommend products or services I use personally and believe will be good for my readers. I am disclosing this in accordance with the Federal Trade Commissions 16 CFR, Part 255 Guides Concerning the Use of Endorsements and Testimonials in Advertising.  Full Disclosure Policy

May 18, 2020

This site has affiliate links and sponsored content. Affiliate links means if you click on my link and buy something, I will earn a small commission from the advertiser at no additional cost to you. Read my Disclosure Policy.

Red, White and Blue Fruit Kabobs #recipe


Looking for a fun and yummy dessert for a Memorial Day, 4th of July or Labor Day party?  Then how about some Fruit Kabobs! 

Materials and ingredients and cost breakdown:

  • Wood Skewers
  • 4 containers strawberries
  • 1 container blueberries 
  • 1 Sara Lee Angel Food Cake (found in the frozen food department) or make a homemade one

How to assemble:
  1. Defrost Angel Food Cake.  Slice the angel food cake and cut into  square/rectangle pieces.
  2. Wash the strawberries and the blueberries and let them drain.  I filled my sink with a water/white vinegar mixture to clean them.
  3. Remove the stem from the strawberries into quarters.
 I assembled my kabobs this way:  strawberry, angel food cake, 2 blueberries, strawberry, angel food cake, and 2 blueberries. Keep assembling until you run out of ingredients. Line them up on serving dish! I assembled my kabobs this way:  strawberry, angel food cake, 2 blueberries, strawberry, angel food cake, and 2 blueberries. Keep assembling until you run out of ingredients. Line them up on serving dish!

Not a fan of angel food cake?  How about these fun substitutions:  pound cake, mini white cupcakes, etc.  You can even switch up the berries.

May 4, 2020

This site has affiliate links and sponsored content. Affiliate links means if you click on my link and buy something, I will earn a small commission from the advertiser at no additional cost to you. Read my Disclosure Policy.

Double Chocolate Banana Muffins #Recipe

Have some ripe bananas that you don't want to waster? Well here is a super yummy recipe that everyone will love!

Ingredients
  • 1½ cups mashed bananas (approximately 3 ripe bananas)
  • ⅓ cup vegetable oil
  • 1 egg
  • 1 cup sugar
  • 1½ cups flour
  • ¼ cup cocoa
  • 1 teaspoon baking soda
  • ¼ teaspoon baking powder
  • 1 cup milk chocolate chips
  • Sugar for sprinkling on tops

Instructions
  1. Preheat oven to 350 degrees F.
  2. Use a stand mixer (paddle attachment) and mix together bananas, oil, and egg. 
  3. In a separate large bowl, sift together sugar, flour, cocoa, baking soda, and baking powder.  
  4. Slowly add dry ingredients  to banana mixture. 
  5. Stir in chocolate chips.
  6. Fill  greased or lined muffin tins approximately 2/3 full. 
  7. Sprinkle the tops of each muffin with sugar.
Bake for 25 to 28 minutes at 350 degrees F (tops will crack).   Makes about 18 muffins

April 28, 2020

This site has affiliate links and sponsored content. Affiliate links means if you click on my link and buy something, I will earn a small commission from the advertiser at no additional cost to you. Read my Disclosure Policy.

Sriracha Turkey Wrap with Guacamole #Recipe

 Sriracha Turkey Wrap with Guacamole

Looking to spice up your lunch? Then try a Sriracha Turkey Wrap with  Guacamole.


You will need the following ingredients:
  • Wraps
  • Pepper Jack Cheese
  • Onion
  • Tomato
  • Turkey Breast Lunch meat
  • Mayo
  • Sriracha Mayo
  • Wholly Guacamole flavor of your choice or your favorite brand of guac!

First up lay our your wrap and slather on your mayo, Sriracha mayo and Wholly Guacamole.  Next layer on your veggies (tomato and onion), top it with pepper jack cheese and turkey breast lunch meat from your local deli!  Fold in the edges and roll up!  Now you have a crisp, cool and spicy turkey wrap!

April 26, 2020

This site has affiliate links and sponsored content. Affiliate links means if you click on my link and buy something, I will earn a small commission from the advertiser at no additional cost to you. Read my Disclosure Policy.

Spicy Guacamole Burger #Recipe

Tired of cooking the same thing while you are stuck at home?  Why not try a Spicy Guac Burger!

Spicy Guacamole Burgers

To achieve these spicy burgers with a kick you will need the following ingredients:
  • A couple pounds of hamburger meat depending on how many folks you are feeding
  • Peppers
  • Tomato
  • Onion
  • Wholly Guacamole (pick your favorite)
  • Pepper Jack cheese slices 
  • Buns
Fire up the grill and get it heated up and ready.  Make your patties, we put a divot in the middle of each one, this helps it to cook evenly on the grill.  Cook your patties the way you normally cook them, right before they are done, top with a slice of pepper jack cheese.


Place your patty on your bun, top with peppers, onions, tomatoes and of course slather on the Wholly Guacamole.   

March 31, 2020

This site has affiliate links and sponsored content. Affiliate links means if you click on my link and buy something, I will earn a small commission from the advertiser at no additional cost to you. Read my Disclosure Policy.

Cat inspired personal pizzas #Recipe

Kids going stir crazy during their extended spring break?   Why not have some fun cooking lessons with them.  Tonight try these fun and easy cat inspired personal pizzas!


Ingredients:
  • 1 can refrigerated biscuits
  • Pepperoni and mini pepperoni
  • Shredded mozzarella cheese 
  • Pizza sauce 
Preheat oven to 375 degrees.

One can of biscuits will make 6 adorable cats. Place the biscuits on a parchment lined cookie sheet a few inches apart.

The other two biscuits were used to cut out triangles to use for the cats ears.  To attach the ears  press them into the circles.  You can also use some of the left over ear dough to roll into balls to make cheeks and noses!

Cut the large pepperoni slices into triangles for the ears and also into strips for the whiskers.

Place the sauce onto the pizza, then top with the cheese.  Then add the cut pepperoni to the ears and the whiskers.  Using the mini pepperoni make the eyes and the noses.


Then bake them in the oven  at 375 degrees  for 15-20 minutes.

March 27, 2020

This site has affiliate links and sponsored content. Affiliate links means if you click on my link and buy something, I will earn a small commission from the advertiser at no additional cost to you. Read my Disclosure Policy.

Cookie Monster Oreos #Recipe

Calling all Sesame Street Fans! Here is a cute Cookie Monster treat that is sure to delight. Cookie Monster Oreos!

Here is what you need:

Instructions:
  1. Line your counter with a piece of wax paper.  This is super important!  It will make your cookies not stick and clean up will be super easy!
  2. Open your mini Oreo. Then using a knife, cut the non-forsoted half into two.  This will be Cookie Monster’s smile.
  3. In a plastic container, melt your candy melts according to package instructions.  (Tip: I like to use a plastic container with a lid.  That way I can keep any extras in the container and remelt later when I need it!)
  4. Drop your large Oreo cookie into the melted candy.  Spoon some candy melt on top.  Once coated, place on your wax paper.
  5. Add two candy eyes (I found the large candy eyes at Meijer, but I’ve also seen them at Hobby Lobby!  You can use the regular candy eyes for an equally cute Cookie Monster!)
  6. Add your mini Oreo half smile.
  7. Coat generously with rock candy or sprinkles.
  8. Allow the Oreos to harden and set for a few minutes.  Shake any excess rock candy or sprinkles off.
  9. Using decorating gel, attach a Cookie Crisp cookie to Cookie Monster’s mouth.  

March 16, 2020

This site has affiliate links and sponsored content. Affiliate links means if you click on my link and buy something, I will earn a small commission from the advertiser at no additional cost to you. Read my Disclosure Policy.

#DIY Slime recipe to keep the kids busy on their extended spring break!

Kids going stir crazy on their extended spring break or just want to limit their electronic time?   Why not have some fun and create their own slime to play with!  A

Elmer’s created several worry-free and kid-friendly recipes (no borax here) to provide teachers and parents alike with hours of entertainment for their students and kiddos.

Below is the “official” kid-friendly Elmer’s slime recipe  and you can find more information and  worry-free recipes like Glitter Slime, Jumbo Slime and more at http://elmers.com/slime.

ELMER’S SLIME RECIPE AND INSTRUCTIONS

Ingredients:
  • 1/2 TBSP of Baking Soda
  • 1 TBSP of Contact Solution
  • 4 fl oz Elmer’s White school glue
  • Your choice of food coloring
Steps:
  1.  Find a bowl, cup, or plate to mix your slime in
      
  2. Pour out the entire contents of a 4oz of Elmer’s school glue into the bowl.

  3. Add ½ TBSP of baking soda and mix
     
  4. After mixing, add your choice of food coloring.
     
  5. Mix and/or add more food coloring until you get the color you want
  6. Add 1 TBSP of Contact solution
     
  7. Mix until slime forms and it begins to get harder to mix
     
  8. Take the slime out and begin kneading with both of your hands
  9. If needed, add ¼ TBSP Contact solution to make the slime less sticky.
Adult supervision is required; This project is not appropriate for children under the age of 3 years

You can find more information and  worry-free recipes like Glitter Slime, Jumbo Slime and more at http://elmers.com/slime.