Showing posts with label craft. Show all posts

November 19, 2020

This site has affiliate links and sponsored content. Affiliate links means if you click on my link and buy something, I will earn a small commission from the advertiser at no additional cost to you. Read my Disclosure Policy.

Gobble Gobble!!! Jolly Rancher Turkey Suckers are perfect for #Thanksgiving treats and table decor! #Recipe


Getting ready for Thanksgiving? These turkey suckers are just the "sweetest"! They are easy to make with just a few ingredients. They are perfect treat for a school party or to use as festive table decorations! 


Ingredients

  • Jolly Ranchers – orange, yellow, green, red
  • Orange Tic-Tacs
  • Candy eyes
  • Red Hot candies
  • Sucker sticks


Directions
  1. Preheat oven to 275 degrees
  2. Line a cookie sheet with parchment paper
  3. Unwrap Jolly Ranchers
     
  4. Stick together 2 yellow Jolly Ranchers vertically, make sure they are touching. Then take your red, orange and green jolly ranchers and stick them above the yellow ones in a fan motion. Leave enough space so when they come out of the oven you can put a sucker stick in them.
  5. Stick in oven for about 5-6 minutes. Keep a close eye on them and take them out when you get the melted desire you are wanting.
     
  6. Immediately roll the end of a sucker stick in each sucker towards the bottom.
      
  7. Quickly add the candy eyes, Tic-Tacs and Red Hots. If suckers start to harden, don’t worry, get a lighter and stick the flame carefully where you want the candies to go to and hold for a few seconds. It will melt the sucker just enough so you can stick the candies on.
      
  8. Let them set at room temperature until harden, about 10 minutes.
  9. Then they are ready to eat!!
Won't your family, friends and kids think these are the cutest sweets every?  So bright and colorful, they are a perfect Turkey Day craft/recipe to do with the kids!

November 16, 2020

This site has affiliate links and sponsored content. Affiliate links means if you click on my link and buy something, I will earn a small commission from the advertiser at no additional cost to you. Read my Disclosure Policy.

Mess Free Pumpkin Decorating for Fall! #Harvest #Thanksgiving

Soon it will be Thanksgiving and that means picking the perfect turkey, making pies and coming up with table decor.  There is so much cleaning up during the holidays, why not make a mess free table decoration! 

This year for Halloween I  already got creative with Sharpie  markers and drew on some pumpkins I picked up at the Amish farm for only $0.75 each!   I still had one more left and decided I wanted something that would be perfect to sit on the table this Thanksgiving.


First up, pick your perfect pumpkin!

You can easily draw on the pumpkins in pencil first to get your base shape on it.  If you are not artistic, you can find an image online.  Cut out the design and then on the back of the paper, using a pencil, color the line area dark. This will make it like carbon paper!  You can see an example on how to to this here.

Tape the design to your pumpkin and trace out the design with a sharp pencil. This will make your faux carbon paper transfer the design to your pumpkin.


With the Sharpie in hand added all the unique details and designs to the pumpkin!  The possibilities are endless!

This pumpkin will look adorable and the dinner table this Thanksgiving, just put under a cute table runner and possibly add some dried out leaves from the yard!

Here is the link to the Halloween themed pumpkins I did previously! 

October 21, 2020

This site has affiliate links and sponsored content. Affiliate links means if you click on my link and buy something, I will earn a small commission from the advertiser at no additional cost to you. Read my Disclosure Policy.

No-Mess Pumpkin Decorating for Halloween

Halloween is fast approaching, which means it’s time to pick up the candy, costumes and of course, the perfect pumpkin for carving. What’s scarier than a spooky Jack-o’-Lantern? The thought of cleaning up the messy kitchen after carving it!
This Halloween, try getting crafty with a new pumpkin decorating tool – Sharpie Extreme permanent markers. Sharpie Extreme delivers bold colors on variety of surfaces, including plastic, glass and wood, so when it comes to decorating pumpkins, there’s no problem and no mess! Even better, Sharpie Extreme resists fading when exposed to extreme outdoor weather conditions like rain, snow and mud, helping your spooktacular designs last all month for the big day.


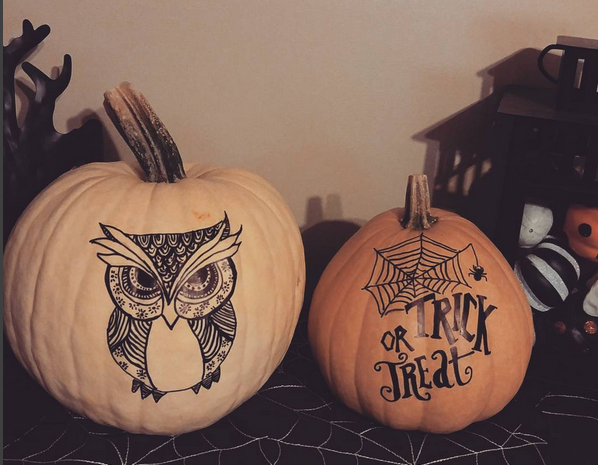
I have been toying with the idea to draw on pumpkins this Halloween and once I received the Sharpie Extreme markers, I knew I had to!  I swung by the Amish farm and picked up a pumpkins for $0.75 and started creating!    Since the markers are permanent, I can put the pumpkin outside and not worry about the colors coming off!


You can easily draw on the pumpkins in pencil first to get your base shape on it.   I drew just the basic owl on my pumpkin at first and then with the Sharpie in hand added all the unique details and designs to his body.  The same for the Trick or Treat, I drew the words on with a pencil and then slowly filled the area with the marker.  Then I freehand drew a web and added a cute spider at the end.   The possibilities are endless!


I still have one more white pumpkin and toying with the idea to make it more of a  Harvest/Thanksgiving theme.  I think if I keep it inside it should last longer with the constant temperature, rather then the cold to hot to iceberg temps we get here outside!

October 6, 2020

This site has affiliate links and sponsored content. Affiliate links means if you click on my link and buy something, I will earn a small commission from the advertiser at no additional cost to you. Read my Disclosure Policy.

DIY Candle Image Transfer! Easy #Halloween Decorations!


Last year at this time we watched the film The Dark Tower as one of our "Halloween" movies.   Of course afterwards, I had to get crafty and see if I could do some sort of decoration for the film to add to our Halloween decor!

The movie The Dark Tower is based on the best-selling book series by highly-acclaimed author Stephen King.  The last Gunslinger, Roland (Idris Elba), has been locked in an eternal battle with the Man in Black (Matthew McConaughey), determined to prevent him from toppling the Dark Tower, which holds the universe together. With the fate of the worlds at stake, good and evil will collide in the epic battle as only Roland can defend the Tower from the Man in Black.


Here’s what you will need to make these DIY Image Transfer Candles:
  • white pillar candle
  • white tissue paper
  • printer and printer paper
  • masking tape
  • scissors
  • wax paper
  • blow dryer
Instructions
  1. Find a design you want to use.  I put mine into Word and then adjusted image size.  This was if you are using a five inch tall candle, you can make sure the design is under five inches.
  2. Cut a piece of tissue paper to slightly smaller than the size of your printer paper. Then tape the tissue paper (shiny side down) to the computer paper.  Make sure it is smooth and flush.  I only used tape on the top and bottom.
       
  3. Print your image onto the tissue paper. Then  cut down the tissue paper down giving a small border around image.
     
  4. Lay your tissue paper  image flat over the candle.
  5. Wrap tightly with wax paper.
     
  6. Heat the candle with your blow dryer. You are slightly melting the surface layer of wax  so that the tissue paper adheres to the candle. You will see the tissue paper edges disappearing and the image until will brighten, this means the image is fused to the candle.
     
  7. Slowly remove the wax paper and admire your work!
For the candle base, I took a terra cot pot base and sprayed it black.
 I then took glow in the dark rubber mice (Halloween section at Target) and sprayed them black as well. Glue the mice to the pot base. Add some decorative rocks and instant creepy design!


July 16, 2020

This site has affiliate links and sponsored content. Affiliate links means if you click on my link and buy something, I will earn a small commission from the advertiser at no additional cost to you. Read my Disclosure Policy.

DIY No Sew T-Shirt Tote Bag


Looking for a super fun, easy way to make your child's favorite last even longer?  Then make it into a no-sew  t-shirt tote bag! A while back at a convention a group of  lovely ladies  taught me how to make this super easy and super adorable bag!
What you will need: 
  • T-Shirt
  • Scissors

Instructions: 
  1. Lay the t shirt flat,  following the seams, cut off the neck on both sides of shirt.  Make sure it scoops on both sides.
  2.  Next cut of the sleeves.  Cutting off the bottom seam is optional.
     
  3. Cut from the bottom up about 3″-4″ long, 3/4″ wide strips all the way across the width of the shirt.  Make sure to also cut the strip in half long way that is on each end of shirt (the fold)
  4. Tie the fringes into knots

July 6, 2020

This site has affiliate links and sponsored content. Affiliate links means if you click on my link and buy something, I will earn a small commission from the advertiser at no additional cost to you. Read my Disclosure Policy.

We Bare Bears: The Movie + Gummy Bear Slime #CampWarnerBros

We Bare Bears: The Movie is now available to own on Digital, Blu-ray & DVD.

When Grizz, Panda, and Ice Bear catch the attention of the Department of Wildlife Control, their world turns upside down! Forced to go on the run by the diabolical Agent Trout, the Bears rely on friends both old and new on a wild and hilarious road trip. Join the Bears as they stack up for their biggest adventure ever!

A great movie about friendship and brotherhood.  It is influenced by today's political climate and addresses many issues we are facing today.  It is a great film to talk about with the kids and the actions in the movie.   It is entertaining for any age!   We love the We Bare Bears the Movie! 

Check out this fun gummy bear slime inspired recipe!   


GUMMY BEAR SLIME INGREDIENTS
  • Gummy bears
  • 1/3 cup powdered sugar
  • 1/3 cup cornstarch
Mix the powdered sugar and cornstarch together.
 
Microwave gummy bears in a heat-safe bowl for 10-15 seconds.

Stir, and continue heating in 10-15 second intervals until gooey. 

Stir in powdered sugar and cornstarch mixture, until the gummy bear slime forms a ball.


A few notes after making this.   I would of divided the bear colors and do different batches to have fun colors to play with.   If it gets too sticky, add more dry ingredients!  


 I received the above mentioned to facilitate this review. Regardless, I only recommend products or services I use personally and believe will be good for my readers. I am disclosing this in accordance with the Federal Trade Commissions 16 CFR, Part 255 Guides Concerning the Use of Endorsements and Testimonials in Advertising.  Full Disclosure Policy

June 30, 2020

This site has affiliate links and sponsored content. Affiliate links means if you click on my link and buy something, I will earn a small commission from the advertiser at no additional cost to you. Read my Disclosure Policy.

American Flag Bandana Wreath

The 4th of July is coming soon and whether you are wanting to get crafty this year or host a party!

This year I decided to get crafty and make an American Flag Bandana Wreath with items from Oriental Trading, but you can get these items just about anywhere!

What you will need to create your American Flag Bandana Wreath:
  • 6 red bandanas
  • 6 blue bandanas
  • 6 white bandanas
  • Scissors
  • 18 inch metal mesh wreath
  • Hook to hang the wreath

    What you will need to create your American Flag Bandana Wreath:
    • 6 red bandanas
    • 6 blue bandanas
    • 6 white bandanas
    • Scissors
    • 18 inch metal mesh wreath
    • Hook to hang the wreath
     
    This is such a fun and easy craft that my 11 year daughter made one along side me!  First thing is remove the tag from the bandana and then cut each bandana in half. Just fold the bandana in half and cut along the crease!   My daughter used some jars to hold her bandanas in place to make sure she cut hers nice and easy (we will be using those same jars in another upcoming project!). 

    Roll the bandanas.  Start with the raw edge and roll it about an inch thick.  Then fold them in half making a V shape.
     

    Place the V shape under your wire wreath with the folded edge on the outside.

    Pull the ends through the V shaped loop you just made.  The ends of the bandana will be facing the outside of the wreath as shown in this photo.  Continue alternating the red and white colors until you have added all of them to the wreath.

    Next do the same steps above with the blue bandana strips.

    Use a pipe cleaner or a metal hook to hang it off of your door hanger, wall, etc.

    June 29, 2020

    This site has affiliate links and sponsored content. Affiliate links means if you click on my link and buy something, I will earn a small commission from the advertiser at no additional cost to you. Read my Disclosure Policy.

    DIY 4th of July Luminaries

    This is a super easy project for the 4th of July   that can be made under a couple of dollars and so easy that your child can do it or help along!     These luminaries are perfect for lining the steps on the porch or to use as a centerpiece for a holiday get together


    What you will need:
    • Glass jars (I used pint sized Ball jars, but you could even reuse jars from the fridge.  Just wash out the pickle smell or the old pasta sauce and peel off the label!)
    • Small American flags
    • Mod Podge 
    • Sponge brush
    • Votive candles or tea lights
    • Jute or ribbon

    The flags I used were Americana style, so they were printed in muted shades of deep red, ivory and navy.  It gives the luminaries an antique look.  First remove the flags from the sticks and then carefully remove the fabric sleeve sewed to the flag to hold it onto the stick.  Not all will have it, some brands are just stapled on to sticks.

    Measure your flag against the jar and apply a thin layer of Mod Podge to the area where the flag will adhere to.  You could also just cover the back of the flag if that makes it easier for you!


     Position the flags evenly on each jar and smooth out any wrinkles or air bubbles that may form. Then apply a thin layer of Mod Podge to the top of each flag to seal it to the jar.


    Let the jars air dry.  I actually put ours in front of the dehumidifier in the basement

    Once dry  tie some jute around the top and  place a candle in each. 
    This is another easy project that your kids can do with little or no assistance.  My 11 year old daughter wanted to make some for family as gifts and did a couple sets all on her own!